| |
|
|
|
|
|
|
| |
|
Through the following short accounts, I have tried to illustrate how I have taken some of the photographs in this collection. The accounts are by no means comprehensive, but hopefully, aided by a few anecdotes, they give a short insight into the equipment, settings, set-ups, and photographic conditions used. |
|
|
| |
|
|
|
|
|
|
| |
|
|
|
|
|
|
| |
|
|
|
|
|
|
| |
|
|
|
|
|
|
| |
|
|
|
|
|
|
| |
|
|
|
The Story Behind the Photograph |
| |
Subject: |
|
Adder, Viper (Vipera berus) |
|
| |
Location: |
|
Hazleton Common Local Nature Reserve,
Cowplain, Hampshire. |
|
| |
Month: |
|
August |
|
| |
Equipment: |
|
Nikon D70, Nikon AF-S DX VR 18-200mm
f3.5-5.6G IF-ED (135mm). |
|
| |
Exposure: |
|
1/320s @ f6.3, Built in TTL Flash. |
|
| |
|
|
|
|
|
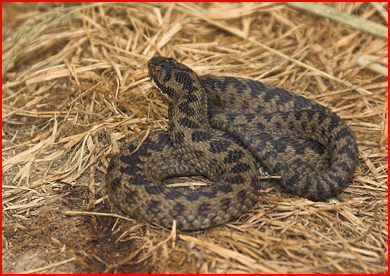
In order to locate Adders to photograph, I placed a corrugated metal sheet was positioned in a local nature reserve where I knew adders were preset. This would then provide a warm environment, shielded from the elements, where the snakes could shelter. I found the best time to photograph this Adder was when it was cool and it was at its most inactive. I lifted the corrugated metal sheet with a stick to avoid a (rare) snake bite, before photographing the snake as quickly as possible so as to cause the least amount of disruption to it. |
|
|
|
|
| |
The Photographic Set-up |
| |
Equipment: |
|
Corrugated Metal Sheet. |
|
| |
|
|
|
|
| |
Adders, or Vipers, are Britain's commonest snake, and the only one that is poisonous. They are very timid animals and normally flee from humans before anyone gets close enough to provoke them into biting. Adders like open places such as heaths, moors, scrubland, and tend to prefer gentle warmth rather than the strong heat of the midday sun.
In order to locate adders to photograph, a corrugated metal sheet was positioned in a location that I knew adders were present. The metal sheet was positioned away from the path where it was unlikely that anyone would find it. The metal sheet was painted black on the upper side so as to absorb the sun's heat, and was painted with the words 'Please Leave Reptile Monitoring' just in case anyone should stumble across it. This would then provide a warm environment, shielded from the elements, where the snakes could shelter.
I find the best time to photograph adders is when it is quite cool and they are at their most inactive. At warmer times they will often make a bolt for the undergrowth before you have a chance of photographing them. The location of the corrugated metal sheet needs to be approached very quietly and with the least disturbance as possible otherwise the snakes will flee. I lift the corrugated metal sheet with a piece of cherry wood approximately 55cm long and 2.5cm diameter that I keep in the car, and get a companion to hold the metal sheet up for me. I use this 'stick' as I do not know how close an adder is to the edge of the metal sheet. Although adder bites are rarely fatal, they do need immediate hospital treatment. I then photograph the snakes as quickly as possible so as to cause the least amount of disruption to them. I finally gently lower the corrugated metal sheet back to its horizontal position, making sure that no snake is caught at the edge of the metal sheet, and vacate the area as quietly as possible.
|
|
| |
|
| |
|
|
|
|
|
|
| |
|
|
|
|
|
|
| |
|
|
|
|
|
|
| |
|
|
|
|
|
|
| |
|
|
|
|
|
|
| |
|
|
|
|
|
|
| |
|
|
|
|
|
|
| |
|
|
|
|
|
|
| |
|
|
|
The Story Behind the Photograph |
| |
Subject: |
|
Slow-worm (Anguis fragilis) |
|
| |
Location: |
|
Rowlands Castle, Hampshire. |
|
| |
Month: |
|
May |
|
| |
Equipment: |
|
Contax 159MM, Tamron SP 90mm f2.5,
Metz 32CT4 Flash, Fujichrome Sensia 100 ISO. |
|
| |
Exposure: |
|
1/250s @ f16, TTL Flash. |
|
| |
|
|
|
|
| |
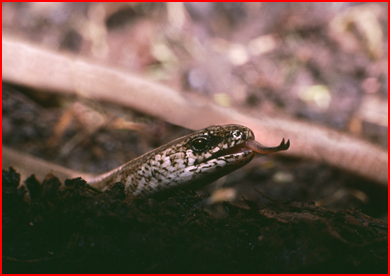
Many times I had seen Slow-worms in the compost heap at the end of my garden. I had tried to get a few shots of them in situ, but obtained nothing special. I then cut down a cardboard box and recreated a compost heap in it in the middle of my kitchen floor. I then placed a Slow-worm in the set and let it settle for a short while. Then by laying on the floor with my camera, I was able to achieve some low angle shots, but again nothing particularly special. I noticed that the Slow-worm was occasionally tasting the air, which gave me the idea of spraying the air in front of it with a houseplant water mister bottle. This did the trick, and the Slow-worm began to taste the air more frequently, its tongue only out for a split second at a time. After several rolls of film I got my shot and the Slow-worm was returned to the compost heap at he end of my garden. |
|
| |
|
|
| |
The Photographic Set-up |
| |
Equipment: |
|
Cardboard Box, Damp Compost, Stone, Houseplant Water Mister Bottle. |
|
| |
|
|
|
|
| |
Many times I had seen slow-worms in the compost heap at the end of my garden. I had tried to get a few shots of them in-situ, but obtained nothing special. I then cut down a cardboard box and recreated a compost heap in it in the middle of my kitchen floor. I then placed a slow-worm in the set and let it settle for a short while. Then by lying on the floor with my camera, I was able to achieve some low angle shots. I noticed that the slow-worm was occasionally tasting the air, so I sprayed the air in front of it with a houseplant water mister bottle. The slow-worm began to taste the air more frequently, its tongue only out for a split second at a time. The slow-worm was returned after a short period to the compost heap at he end of my garden. It is paramount when creating an artificial environment in which to photograph an animal, that the welfare of the animal is kept a priority at all times. The set-up should closely resemble that of the animal's natural habitat as much as possible. No photograph is ever worth putting any animal under stress for.
|
|
| |
|
| |
|
|
|
|
|
|
| |
|
|
|
|
|
|
| |
|
|
|
|
|
|
| |
|
|
|
|
|
|
| |
|
|
|
|
|
|
| |
|
|
|
|
|
|
| |
|
|
|
|
|
|
| |
|
|
|
|
|
|
| |
|
|
|
The Story Behind the Photograph |
| |
Subject: |
|
Edible Crab (Cancer pagurus) |
|
| |
Location: |
|
Havant, Hampshire. |
|
| |
Month: |
|
May |
|
| |
Equipment: |
|
Contax 159MM, Tamron SP 90mm f2.5, Metz 32CT4 Flash, Fujichrome Sensia ISO 100. |
|
| |
Exposure: |
|
1/125s @ f16, TTL Flash. |
|
| |
|
|
|
|
| |
I had for many years, as a marine biologist, attempted to photograph marine rockpool organisms in their natural habitat. The photographs, although good record shots, were not particularly spectacular. It is very difficult to achieve a low angle of view out in the field without immersing the camera and lens in the water. I found out the hard way that camera equipment and salt water do not mix! Having worked in an aquarium, I used my knowledge of setting up native marine aquariums to create a temporary aquarium in my study. It is not an easy task to get all the conditions just right so that no distress in inflicted on the rockpool organisms, something that is paramount when creating an artificial environment in which to photograph wildlife. My aquarium allowed me to observe the organisms from close quarters and get a low angle of view on them. This shot was taken in the very early hours of the morning when the Edible Crab was most active. The crab used to tap on the glass of the aquarium, which seemed to be a signal that it wanted feeding! I managed to get this shot of the crab attempting to rip open the Mussels. On completion of my photo shoot, the organisms were returned to the same location as I found them. |
|
| |
|
|
| |
The Photographic Set-up |
| |
Equipment: |
|
Glass Tank, Hood, Filter Plate, Gravel Filter Bed, Canister Filter, Protein Skimmer, Air Pumps (x2). |
|
| |
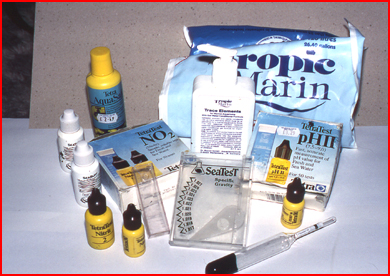
I had for many years, as a marine biologist, attempted to photograph marine rockpool organisms in their natural habitat. The photographs, although good record shots, were not particularly spectacular. It is very difficult to achieve a low angle of view out in the field without immersing the camera and lens in the water. I found out the hard way that camera equipment and salt water do not mix! Having worked in an aquarium, I used my knowledge of setting up native marine aquariums to create a temporary aquarium in my study. The aquarium allowed me to observe the organisms from close quarters and get a low angle of view on them.
In a natural rockpool the water is replenished, cooled and reoxygenated every time the tide comes in, a new supply of food is brought to the rockpool, and any toxic waste products are washed away. This natural balancing of the rockpool conditions does not happen in the artificial set-up and therefore has to be carried out manually. It is not an easy task to get all the conditions just right so that no distress in inflicted on the rockpool organisms, something that is imperative when creating an artificial environment in which to photograph wildlife.
Continual testing and cleaning the seawater in the aquarium is paramount, and the filtration system is at the heart of this. I use a combination of chemical, biological and mechanical filtration to keep a high level of water quality. Firstly a protein skimmer (pictured in the left hand side of the aquarium opposite) is uses to remove much of the nitrogen based waste products so that pressure is taken off the filtration system. The water is drawn out of the tank and is passed through a powerful canister filter (shown opposite) where it flows through a number of filtration layers, filter wool (mechanical), charcoal (chemical) and ceramic tubes covered in bacteria (biological). The water is then pumped through a filter plate at the base of the aquarium and up through layers of coarse then fine gravel. The many bacteria contained in this substrate help in breaking down waste products in the water. Water is pumped up through the filter bed rather than down through it so that any rotting particles of food can be forced out of the fine gravel bed. Through this filtration ammonia is broken down to nitrites and then nitrates before being broken down into nitrogen that can then escape into the air.
Seawater testing kits (pictured opposite) can be used to make sure that the levels of ammonia, nitrite and nitrate are within acceptable levels. Water salinity is tested using a hydrometer and adjusted by adding salt or fresh water. Water pH (acidity or alkalinity) can be controlled by adding pH buffers. The water is cooled by taking approximately 5 litres of it out each day and freezing it, and then reintroducing the ice back into the aquarium. Nutrients can be replenished by adding them to the water. Seawater is made up from aquarium salt and tap water and then left for a few days to allow any chlorine to escape into the air. Water can be taken from the sea in clean sea areas, however care must be taken as to where the water is taken from. Any pollutants or toxins in the water will be concentrated when in the aquarium. The water is aerated using a couple of powerful air pumps pumping air through wooden blocks.
In order to provide food as close as possible to the food the organisms would receive in the wild I liquidised whole prawns, white fish and spinach (for the herbivores) along with seawater and then froze the liquid in ice cube trays (pictured opposite). In this way I could feed the organisms the food they required by dropping a couple of food cubes into the water which when melted left the food in suspension.
A range of rockpool organisms can be kept for short periods of time (up to 10 weeks) in this way, although consideration needs to be given to the feeding relationships between the various competing animals. Unlike freshwater aquariums, it is important in native marine aquariums not to introduce any algae that can cause problems as it rots. A number of rocks and empty shells were introduced to the aquarium to provide the rockpool habitat (pictured opposite).
It is paramount when creating an artificial environment in which to photograph animals, that the welfare of the animal is kept a priority at all times. The set-up should closely resemble that of the animal's natural habitat as much as possible. No photograph is ever worth putting any animal under stress for. On completion of my photo shoot, the organisms were returned to the same location as I found them.
|
|
| |
|
| |
|
|
|
|
|
|
| |
|
|
|
|
|
|
| |
|
|
|
|
|
|
| |
|
|
|
|
|
|
| |
|
|
|
|
|
|
| |
|
|
|
|
|
|
| |
|
|
|
|
|
|
| |
|
|
|
|
|
|
| |
|
|
|
The Story Behind the Photograph |
| |
Subject: |
|
Red Squirrel (Sciurus vulgaris) |
|
| |
Location: |
|
Formby Point, Merseyside. |
|
| |
Month: |
|
March |
|
| |
Equipment: |
|
Nikon F90X, Tokina AT-X AF 400mm f5.6, Nikon SB28 Flash, Monopod, Fujichrome Sensia 100 ISO. |
|
| |
Exposure: |
|
1/125s @ f5.6, TTL Flash. |
|
| |
|
|
|
|
|
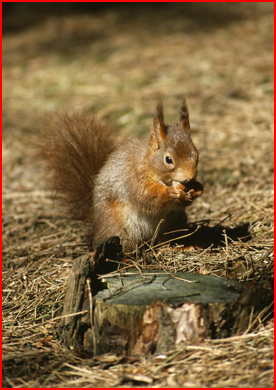
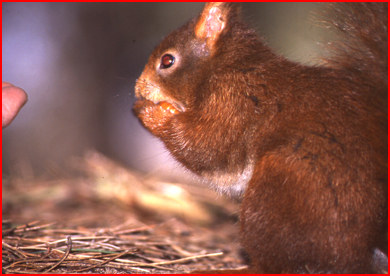
I had seen a red squirrel before so off I went over to Brownsea Island in Dorset to try to photograph them. A whole day of walking around the island and I did not even see one never mind photograph one! I heard that there was a reasonable size population of reds in the Freshfield Squirrel Reserve at Formby Point in Merseyside, so off I went to investigate, camera gear and a couple of bags of hazel nuts in hand. I could not believe my eyes, one of Britain’s rarest mammals and they were everywhere, including sitting in my camera bag and hanging from my coat pocket, both locations of my bags of nuts. I found a secluded bank away from visitors to the park where I could quietly sit and wait for the squirrels to come to me, or more correctly, my hazel nuts! |
|
|
|
|
| |
The Photographic Set-up |
| |
Equipment: |
|
A Couple of Bags of Hazel Nuts! |
|
| |
|
|
|
|
| |
To be I had seen a red squirrel before so off I went over to Brownsea Island in Dorset to try to photograph them. A whole day of walking around the island and I did not even see one never mind photograph one! I heard that there was a reasonable size population of reds in the Freshfield Squirrel Reserve at Formby Point in Merseyside, so off I went to investigate, camera gear and a couple of bags of hazel nuts in hand. I could not believe my eyes, one of Britain’s rarest mammals and they were everywhere, including sitting in my camera bag and hanging from my coat pocket, both locations of my bags of nuts. The photographs opposite show a red squirrel about to climb into my camera bag to retrieve some hazel nuts, and one I fed by hand as I took a photograph of it.
|
|
| |
|
| |
|
|
|
|
|
|
| |
|
|
|
|
|
|
| |
|
|
|
|
|
|
| |
|
|
|
|
|
|
| |
|
|
|
|
|
|
| |
|
|
|
|
|
|
| |
|
|
|
|
|
|
| |
|
|
|
|
|
|
| |
|
|
|
The Story Behind the Photograph |
| |
Subject: |
|
Fallow Deer (Dama dama) |
|
| |
Location: |
|
Petworth Park, West Sussex. |
|
| |
Month: |
|
August |
|
| |
Equipment: |
|
Nikon D70, Tokina AT-X AF 400mm f5.6, Monopod. |
|
| |
Exposure: |
|
1/1600s @ f6 (-1.3 Ev) |
|
| |
|
|
|
|
| |
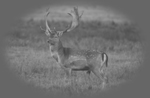
I had been stalking a number of groups of deer for several hours by moving from tree to tree in order to disguise myself. I then carefully crawled towards the deer to get the shot. As the photograph was taken at the end of the day, I was able to capitalise on the warm quality of the light to produce a rather 'moody' image. |
|
| |
|
|
| |
The Photographic Set-up |
| |
Equipment: |
|
Nikon D70, Tokina AT-X AF 400mm f5.6, Monopod. |
|
| |
|
|
|
|
| |
Stalking groups of deer can take a great deal of patience and time, sometimes several hours. By moving from tree to tree, and also by wearing a similar colour top to the environment, does give you an element of disguise. It is important to stay as low to the ground as possible when crawling towards the deer and be as quiet as possible so to limit disturbance. Taking photographs at the end of the day to capitalise on the warm quality of the light to produce a rather 'moody' image has its problems in that low light reduces the shutter speeds available to you, and this problem is more prevalent when using long lenses.
|
|
| |
|
| |
|
|
|
|
|
|
| |
|
|
|
|
|
|
| |
|
|
|
|
|
|
| |
|
|
|
|
|
|
| |
|
|
|
|
|
|
| |
|
|
|
|
|
|
| |
|
|
|
|
|
|
| |
|
|
|
|
|
|
| |
|
|
|
The Story Behind the Photograph |
| |
Subject: |
|
Robin (Erithacus rebecula) |
|
| |
Location: |
|
Wildfowl & Wetlands Trust, Arundel, West Sussex. |
|
| |
Month: |
|
January |
|
| |
Equipment: |
|
Nikon D70, Nikon AF-S DX VR 18-200mm
f3.5-5.6G IF-ED (200mm), Nikon SB800 Flash. |
|
| |
Exposure: |
|
1/320s @ f8, TTL Flash. |
|
| |
|
|
|
|
| |
I had seen an elusive Water Rail in some reeds and was waiting for it to reappear so I could take some photographs. While waiting I was befriended by this particular Robin that was quite happy being no more than an arms length away from me. In order to get a lower angle shot of the Robin, I lied on the floor to get a more natural, front on, perspective. The downside was that my front was less clean than it was before, and I had a load of funny stares from onlookers - but hey, that's wildlife photography!
|
|
| |
|
|
| |
The Photographic Set-up |
| |
Equipment: |
|
The Ground! |
|
| |
|
|
|
|
| |
I was sitting on a bench taking photographs of a robin, however, when reviewing the images, due to the high camera angle, above the bird looking down, I founds the shots to be a bit unnatural. By lying on the floor I had a more natural, front on, perspective. The downside was that my front was less clean than it was before, and I had a load of funny stares from onlookers - but hey, that's wildlife photography!
|
|
| |
|
| |
|
|
|
|
|
|
| |
|
|
|
|
|
|
| |
|
|
|
|
|
|
| |
|
|
|
|
|
|
| |
|
|
|
|
|
|
| |
|
|
|
|
|
|
| |
|
|
|
|
|
|
| |
|
|
|
|
|
|
| |
|
|
|
The Story Behind the Photograph |
| |
Subject: |
|
Bluetit (Parus caeruleus) |
|
| |
Location: |
|
Cowplain, Hampshire. |
|
| |
Month: |
|
December |
|
| |
Equipment: |
|
Nikon D70, Nikon 500mm f4P IF-ED, Kirk Lowpod,
Arca-Swiss Monoball B1, Wimberley Sidekick Gimbal Head. |
|
| |
Exposure: |
|
1/250s @ f4 |
|
| |
|
|
|
|
| |
The window that looks out over my garden has a very deep sill. I am able to open the windows and support my camera and lens on a Kirk Lowpod, a flat metal base on rubber feet that stands on the window sill, weighed down with a bean bag. I can attach a ball and socket head / gimbal head combination to the Lowpod giving me a camera support where a tripod would not fit. This set-up creates an ideal (and most comfortable) hide. I purchased a bird feeder pole and positioned it in front of the Hawthorn hedge at the back of my garden, and then gradually moved it towards the house over several days. Soon the Bluetit was quite happy posing on the feeder pole allowing me to photograph it.
|
|
| |
|
|
| |
The Photographic Set-up |
| |
Equipment: |
|
Nikon D70, Nikon 500mm f4P IF-ED, Kirk Lowpod,
Arca-Swiss Monoball B1, Wimberley Sidekick Gimbal Head, Beanbag, Hotshoe Spirit Level. |
|
| |
|
|
|
|
| |
The window that looks out over my garden has a very deep windowsill. I am able to open the windows and support my camera on the sill that creates an ideal (and most comfortable) hide. The camera and lens are supported on a Kirk Lowpod, a flat metal base on rubber feet that stands on the window sill, weighed down with a bean bag to stop the whole assembly from toppling over. I can attach a ball and socket head / gimbal head combination to the Lowpod giving me a camera support where a tripod would not fit. The Wimberley Sidekick allows me to convert my Arca-Swiss ball and socket head into a gimbal head. This allows the camera lens combination to balance on its centre of mass point which in turn allows free 2 plane movement of the lens without it slipping down, irrespective of the tension in the ball and socket head. A small hotshoe spirit level allows me to keep the horizontal plane level.
|
|
| |
|
| |
|
|
|
|
|
|
| |
|
|
|
|
|
|
| |
|
|
|
|
|
|
| |
|
|
|
|
|
|
| |
|
|
|
|
|
|
| |
|
|
|
|
|
|
| |
|
|
|
|
|
|
| |
|
|
|
|
|
|
| |
|
|
|
The Story Behind the Photograph |
| |
Subject: |
|
Field Vole (Microtus agrestis) |
|
| |
Location: |
|
Broadmarsh, Bedhampton, Hampshire. |
|
| |
Month: |
|
October |
|
| |
Equipment: |
|
Nikon F3HP, Tamron SP 300mm f5.6, Tamron 300mm Lens Tripod Mounting Ring, Tamron 2x Flatfield Converter, Manfrotto Grip Action Ball Head, Fujichrome Sensia 100 ISO. |
|
| |
Exposure: |
|
1/125s @ f5.6 |
|
| |
|
|
|
|
| |
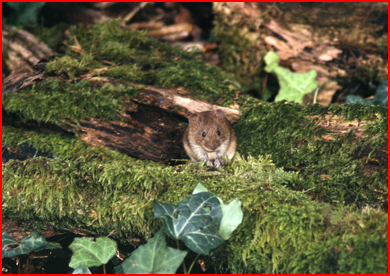
Having seen something moving at the side of the road near the sewage treatment works at Broadmarsh, I had been laying bait over a period of days. To start with the Field Vole would come out for a split second to grab a grain of corn and disappear just as fast. Eventually over a period of days it would stay out for just that little bit longer. Eventually I was able to get the shot from inside my car using supporting the lens at the car window. |
|
| |
|
|
| |
The Photographic Set-up |
| |
Equipment: |
|
Nikon F3HP, Tamron SP 300mm f5.6, Tamron 300mm Lens Tripod Mounting Ring, Tamron 2x Flat Field Converter, Tamron Adaptall-2 Nikon Lens Mount, Manfrotto Grip Action Ball Head. |
|
| |
|
|
|
|
| |
The car can make a useful hide, especially to photograph shy animals at the side of a road, in particular field voles in this case. The camera/lens/converter assembly was attached to a Manfrotto Grip Action Ball Head via a Tamron 300mm Lens Tripod Mounting Ring. The grip action ball head was in turn screwed onto a threaded support clamped by brackets that were screwed to the inside of the car door. The benefits of using the grip action ball head where that the camera assembly could be supported at head height, and also be supported for long periods of time without having to keep hold of it. I find beanbags positioned on the car windowsill to be an ideal support for the camera and lens, however, for long periods of time the camera and lens would have to be held by the photographer.
|
|
| |
|
| |
|
|
|
|
|
|
| |
|
|
|
|
|
|
| |
|
|
|
|
|
|
| |
|
|
|
|
|
|
| |
|
|
|
|
|
|
| |
|
|
|
|
|
|
| |
|
|
|
|
|
|
| |
|
|
|
|
|
|
| |
|
|
|
The Story Behind the Photograph |
| |
Subject: |
|
Kidney Vetch (Anthyllis vulneraria) |
|
| |
Location: |
|
Portchester, Hampshire. |
|
| |
Month: |
|
July |
|
| |
Equipment: |
|
Contax 139, Tamron SP 90mm f2.5, Cable Release, Aluminium Shoulder Pod / Rifle Grip with Leg Attachment, Fujichrome Sensia 100 ISO. |
|
| |
Exposure: |
|
1/60s @ f16, +1 stop, (1:3). |
|
| |
|
|
|
|
| |
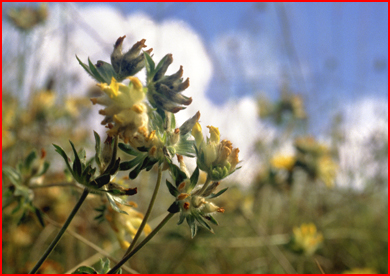
Due to their inaccessibility, embankments on the side of motorways can be a rich source of flora and fauna as they are relatively undisturbed. This particular motorway embankment at the side of the M27 could be accessed from a disused chalk pit in Portchester. By modifying an old aluminium shoulder pod I found in a 'bargain bucket' in a camera shop, I was able to use it to support the camera and lens so that could be close to the ground looking up. In this way I could get this shot of the Kidney Vetch from a low angle with the blue sky and clouds as a backdrop. |
|
| |
|
|
| |
The Photographic Set-up |
| |
Equipment: |
|
Contax 139, Tamron SP 90mm f2.5, Tamron Adaptall-2 Contax/Yashica Lens Mount, Cable Release, Aluminium Shoulder Pod / Rifle Grip with Leg Attachment. |
|
| |
|
|
|
|
| |
I found this aluminium shoulder pod in a 'bargain bucket' of a camera shop. A snip at a 'fiver', I bought it to see what could be done with it. As a shoulder pod for supporting long lenses (what it was designed for), it was next to useless! However, with a little bit of adaptation, it proved to be an excellent camera support for taking close-up shots of wild flowers on embankments, especially where I wanted to be close to the ground looking up.
|
|
| |
|
| |
|
|
|
|
|
|
| |
|
|
|
|
|
|
| |
|
|
|
|
|
|
| |
|
|
|
|
|
|
| |
|
|
|
|
|
|
| |
|
|
|
|
|
|
| |
|
|
|
|
|
|
| |
|
|
|
|
|
|
| |
|
|
|
The Story Behind the Photograph |
| |
Subject: |
|
Common Spotted Orchid (Dactylorhiza fuchsii) |
|
| |
Location: |
|
Portchester, Hampshire. |
|
| |
Month: |
|
July |
|
| |
Equipment: |
|
Canon F1NAE, Tamron SP 300mm f5.6, Tamron 2x Flat Field Converter, Clubman Tripod, Cable Release, White Reflector, Fujichrome Sensia 100 ISO. |
|
| |
Exposure: |
|
1/8s @ f8, (1:3). |
|
| |
|
|
|
|
| |
Photographing this Common Spotted Orchid, I was able to get a much better perspective, along with isolating the subject from the background to a greater extent, by using a longer focal length lens. By using a white rain jacket as a reflector, I was able to throw natural light back at the subject to fill in some of the harsher shadows. Being at the bottom of an old disused chalk pit gave protection against the wind that allowed me to use a slow shutter speed as I did not have to worry about subject movement. |
|
| |
|
|
| |
The Photographic Set-up |
| |
Equipment: |
|
Canon F1NAE, Tamron SP 300mm f5.6, Tamron 2x Flat Field Converter, Tamron Adaptall-2 Canon Lens Mount, Clubman Tripod, Cable Release, White Rain Jacket. |
|
| |
|
|
|
|
| |
Photographing some wild flowers such as orchids, you get a much better perspective and are able to isolate the subject from the background to a greater extent by using a longer focal length lens. The manual focusing Tamron SP 300mm lens has extremely good close focusing facility for its focal length. There are many of these lenses still available on the second hand market at bargain prices. The beauty of this lens is that it fits most makes of camera provided that the appropriate Adaptall-2 lens mount is used. In my camera bag I keep a lightweight white rain jacket that I use more often as an light reflector (pictured in the inset photograph opposite). In this way I can throw natural light back at the subject to fill in some of the harsher shadows.
|
|
| |
|
| |
|
|
|
|
|
|
| |
|
|
|
|
|
|
| |
|
|
|
|
|
|
| |
|
|
|
|
|
|
| |
|
|
|
|
|
|
| |
|
|
|
|
|
|
| |
|
|
|
|
|
|
| |
|
|
|
|
|
|
| |
|
|
|
The Story Behind the Photograph |
| |
Subject: |
|
Primrose (Primula vulgaris) |
|
| |
Location: |
|
Cowplain, Hampshire. |
|
| |
Month: |
|
March |
|
| |
Equipment: |
|
Nikon D70, Nikon AF 105mm f2.8D Micro,
Gitzo G1548 Mountaineer Tripod,
Arca-Swiss Monoball B1. |
|
| |
Exposure: |
|
1/30s @ f36 |
|
| |
|
|
|
|
|
Several years previously, I had planted a few Primroses in my lawn that I sourced from a wildflower supplier. Over the last few years they have been self seeding and I have a reasonable crop of Primroses scattered through my lawn each spring. By using a sturdy tripod that enabled me to get reasonably close to the ground allowed me to get this shot. |
|
|
|
|
| |
The Photographic Set-up |
| |
Equipment: |
|
Nikon D70, Nikon AF 105mm f2.8D Micro,
Gitzo G1548 Mountaineer Tripod,
Arca-Swiss Monoball B1. |
|
| |
|
|
|
|
| |
Using a very stable tripod to photograph wild flowers gives you a solid base to work from. The Gitzo G1548 allows you to get very near to the ground while the Arca-swiss tripod head allows fluid movement of the camera and lens.
|
|
| |
|
| |
|
|
|
|
|
|
| |
|
|
|
|
|
|
| |
|
|
|
|
|
|
| |
|
|
|
|
|
|
| |
|
|
|
|
|
|
| |
|
|
|
|
|
|
| |
|
|
|
|
|
|
| |
|
|
|
|
|
|
| |
|
|
|
The Story Behind the Photograph |
| |
Subject: |
|
Common Knapweed, Hardheads, Blackheads
(Centaurea nigra) |
|
| |
Location: |
|
Old Winchester Hill, South Downs, Hampshire. |
|
| |
Month: |
|
August |
|
| |
Equipment: |
|
Nikon D70, Nikon AF 60mm f2.8D Micro. |
|
| |
Exposure: |
|
1/80s @ f10, Built in TTL Flash. |
|
| |
|
|
|
|
|
To be written.
|
|
|
| |
The Photographic Set-up |
| |
Equipment: |
|
Nikon D70, Nikon AF-S DX VR 18-200mm
f3.5-5.6G IF-ED, the ground! |
|
| |
|
|
|
|
| |
Ideally the photography of wildflowers would benefit from the use of a sturdy tripod. The disadvantage is that a tripod has to be carried, more of a problem if you are out for the day and covering long distances. Taking photographs from above the subject can make it look unnatural, so the best way is to get down flat on the ground at their level, and providing a rigid support the camera with ones elbows.
|
|
| |
|
| |
|
|
|
|
|
|
| |
|
|
|
|
|
|
| |
|
|
|
|
|
|
| |
|
|
|
|
|
|
| |
|
|
|
|
|
|
| |
|
|
|
|
|
|
| |
|
|
|
|
|
|
| |
|
|
|
|
|
|
| |
|
|
|
The Story Behind the Photograph |
| |
Subject: |
|
Copse Snail (Arianta arbustorum) |
|
| |
Location: |
|
Highdown Hill, West Sussex. |
|
| |
Month: |
|
August |
|
| |
Equipment: |
|
Nikon D70, Nikon AF 105mm f2.8D Micro,
Nikon SU-800 Speedlight Commander,
Nikon SB-R200 Flash (x2). |
|
| |
Exposure: |
|
1/200s @ f20, TTL Flash, 2:1 Flash Ratio,
-1/3 Stop (flash). |
|
| |
|
|
|
|
| |
I had been tracking a Small Heath Butterfly for quite a white on Highdown Hill in West Sussex, an area known for its abundance of butterflies. Unfortunately that day, butterflies appeared to be fairly scarce, probably due to being a poor year for butterflies full stop. While on my knees I noticed quite a number of Copse Snails in the grass low to the ground. By getting down to their level by lying on the ground, I was able to take this shot. |
|
| |
|
|
| |
The Photographic Set-up |
| |
Equipment: |
|
Nikon D70, Nikon AF 105mm f2.8D Micro,
Nikon SU-800 Speedlight Commander,
Nikon SB-R200 Flash (x2), the ground! |
|
| |
|
|
|
|
| |
Copse snails are found in the grass low to the ground and can be easily disturbed. The only way to effectively photograph them is to get at or below their level by lying on the ground and moving to a position where you have a clean shot at them without other foliage getting in the way.
|
|
| |
|
| |
|
|
|
|
|
|
| |
|
|
|
|
|
|
| |
|
|
|
|
|
|
| |
|
|
|
|
|
|
| |
|
|
|
|
|
|
| |
|
|
|
|
|
|
| |
|
|
|
|
|
|
| |
|
|
|
|
|
|
| |
|
|
|
The Story Behind the Photograph |
| |
Subject: |
|
Seven-spot Ladybird (Coccinella 7-punctata
& Green Shield Bug (Palomena prasina) |
|
| |
Location: |
|
Old Winchester Hill, South Downs, Hampshire. |
|
| |
Month: |
|
August |
|
| |
Equipment: |
|
Nikon D70, Nikon AF 105mm f2.8D Micro,
Nikon SU-800 Speedlight Commander,
Nikon SB-R200 Flash (x2). |
|
| |
Exposure: |
|
1/200s @ f22, TTL Flash, 2:1 Flash Ratio,
-1/3 Stop (flash), (1:1). |
|
| |
|
|
|
|
|
7 Spot Ladybirds and Green Shield Bugs are reasonably common, however you do not often see them together, especially facing each other in this way. Due to the gusty conditions I had to wait until the wind had dropped so that the Cow Parsley (Anthriscus sylvestris) that these insects were on would stop moving enough so that a sharp picture could be taken. The photograph was under exposed slightly in order to bring out the rich purple colour in the stem of the Cow Parsley. |
|
|
|
|
| |
Photographic Equipment |
| |
Equipment: |
|
Nikon D70, Nikon AF 105mm f2.8D Micro,
Nikon SU-800 Wireless Speedlight Commander,
Nikon SB-R200 Flash (x3),
Nikon SY-1-52 Adapter Ring (52mm),
Nikon SX-1 Attachment Ring. |
|
| |
|
|
|
|
| |
Using a Nikon AF 105mm f2.8D Micro lens gives a magnification of down to 1:1 (life size) at a reasonable working distance.
The 52mm Nikon SY-1-52 Adapter Ring screws into the front of the lens and the Nikon SX-1 Attachment Ring clams on this adapter ring. Nikon SB-R200 flash heads are clamped to the attachment ring, however they do have freedom to be moved around the attachment ring to the desired position. The Nikon SU-800 Speed Light Commander controls the flash heads independently and remotely. The proportion of light coming from the 2 side flash heads is TTL controlled, and can be altered to provide some modelling. I generally use them in a proportion of 2:1, with a flash exposure compensation set at -1/3 of a stop. The top flash head is controlled as a manual flash and can be used to light the background if needed. The flash heads can be detached from the attachment ring and situated in a more desired position.
The set-up allows for precise positioning and wireless activation of the flash heads on the front of the lens. Its relatively compact set-up means there are no brackets or wires so the equipment does not get tangled up in foliage and disturb the subject to be photographed.
|
|
| |
|
| |
|
|
|
|
|
|
| |
|
|
|
|
|
|
| |
|
|
|
|
|
|
| |
|
|
|
|
|
|
| |
|
|
|
|
|
|
| |
|
|
|
|
|
|
| |
|
|
|
|
|
|
| |
|
|
|
|
|
|
| |
|
 |
| |
 |
| |
 |
1:2 @ f11 |
1:2 @ f16 |
1:2 @ f22 |
|
| |
 |
|
|
The Story Behind the Photograph |
| |
Subject: |
|
Meadow Grasshopper (Chorthippus parallelus) |
|
| |
Location: |
|
Portchester, Hampshire. |
|
| |
Month: |
|
July |
|
| |
Equipment: |
|
Contax 139, Tamron SP 90mm f2.5, Cobra 500 CD Flashgun, Flash Bounce Shoe, PC Flash Sync Lead, Hoya 49 mm Diameter +2 and +4 Dioptre Screw in Close-up Lenses, Perutz Chrome 100. |
|
| |
Exposure: |
|
1/60s @ f32, Manual Flash, (1:1). |
|
| |
|
|
|
|
| |
I had located this old disused chalk pit near the edge of the M27 motorway, which appeared to be a veritable haven for all kinds of plant and invertebrate life. This Meadow Grasshopper was found at the top of the chalk pit, away from the shelter that the pit afforded and was quite exposed to the elements. By using a couple of screw in close-up lenses, I was able to extend the magnification of my macro lens from 2:1 to 1:1 without loosing any 'f' stops of light. |
|
| |
|
|
| |
Photographic Equipment |
| |
Equipment: |
|
Contax 139, Tamron SP 90mm f2.5, Tamron Adaptall-2 Contax/Yashica Lens Mount, Cobra 500 CD Flashgun, Flash Bounce Shoe, PC Flash Sync Lead, Hoya 49 mm Diameter +2 and +4 Dioptre Screw in Close-up Lenses. |
|
| |
|
|
|
|
| |
This is a comparatively inexpensive macro set-up that I used extensively as a student (when money was short) to photograph a range of invertebrate subjects. Any inexpensive SLR camera could be used, although it would be useful to have a PC flash socket and manual exposure control.
Attached is a manual focus Tamron 90mm macro lens. There are many of these lenses still available on the second hand market at bargain prices. The beauty of this lens is that it fits most makes of camera provided that the appropriate Adaptall-2 lens mount is used. The lens gives a magnification of down to 1:2 (half life size), although it can be adapted to give 1:1 magnification (life size) by attaching Tamron's 2x Flat Field Converter, or by screwing close-up filter type lenses (pictured opposite) to the front of the lens. I favoured the second of these 2 options. Attaching the converter makes the lens longer and bulkier, and the viewing screen darker as 2 stops of light are lost. Attaching the close-up lenses (+2 dioptre and +4 dioptre) is easier, quicker, and more convenient, especially when you are up to your neck in brambles!
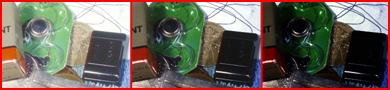
Attached to the camera hot shoe by an inexpensive flash bounce shoe is a Cobra flashgun having a guide number of 20 metres at ISO 100, although any inexpensive flashgun of around this guide number would do. The flashgun is connected to the camera's PC socket by a short PC flash sync lead, and tilted over the front of the lens by adjusting the flash bounce shoe. In order to obtain correct exposures with this set-up, I made a number of test exposures of a group of small objects of varying colour and reflectivity at a range of magnification and lens aperture settings (pictured opposite). The test exposures were then assessed them for correct exposure that would allow me to ascertain the correct lens aperture to use for each magnification (i.e. 1:1, 1:2, 1:3, and 1:5). When taking test exposures it is important to use transparency slide film or digital, as exposure of print film would be corrected at the printing stage.
It is a compact set-up and as there are no brackets so the equipment does not get tangled up in foliage and disturb the subject to be photographed.
|
|
| |
|
| |
|
|
|
|
|
|
| |
|
|
|
|
|
|
| |
|
|
|
|
|
|
|